

Setting up a Shopify store is not the only thing needed to make it a successful brand. To grow sales, for example, you need to track how people use your store. You must know what pages they visit, where they leave, and what makes them buy. Without tracking, you are just assuming, and assuming never helps in business. And that is why using Shopify Google Tag Manager can be a great thing.
Here’s a fact, research says most people leave a page in just 10 to 20 seconds if it doesn’t grab their attention fast. For e‑commerce pages, like product listings, the average time spent is only a minute or so.
This is where Google Tag Manager comes into play. Google Tag Manager, also called GTM, is a free tool that helps you manage tracking codes, also called tags, on your Shopify store. This step is important whether you’re editing an existing theme or setting up a Shopify store for the first time.
According to Statista, global eCommerce sales are expected to reach 7.9 trillion USD by 2030. With such fast growth, stores must understand what visitors do. And for this reason, knowing how to set up Google Tag Manager in Shopify is very, very important.
Google Tag Manager, or GTM, is like a small box where you keep all tracking codes. These codes track clicks, sales, and other actions on your store.
Earlier, people used to add every code directly into the site. One mistake, and the site could break. With GTM, you don’t touch the code again. You just manage everything from one dashboard.
For Shopify, this is very useful. With Shopify Google Tag Manager, you can connect GTM with Google Ads, Analytics, or even Facebook Pixel. This is why most store owners apply it. Because with GTM, you can track your customers easily.
The first thing you need to do is create a Google Tag Manager (GTM) account. Don’t worry, it’s not rocket science. It’s as simple as making a new Gmail ID.
Just go to Google Tag Manager, and hit that big Create Account button.
Now add your business name. And select the country.
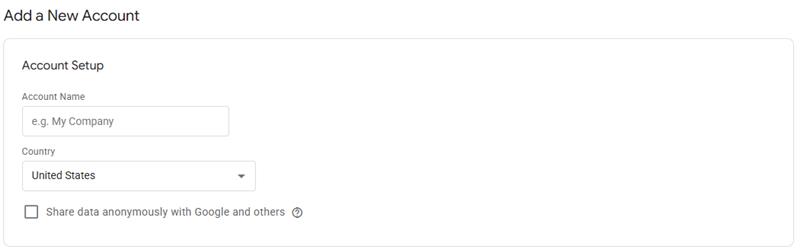
And then set up the container name, which is your website name.

You should keep it clean. Use your brand name or store name as the account name. Simple and easy to track later.
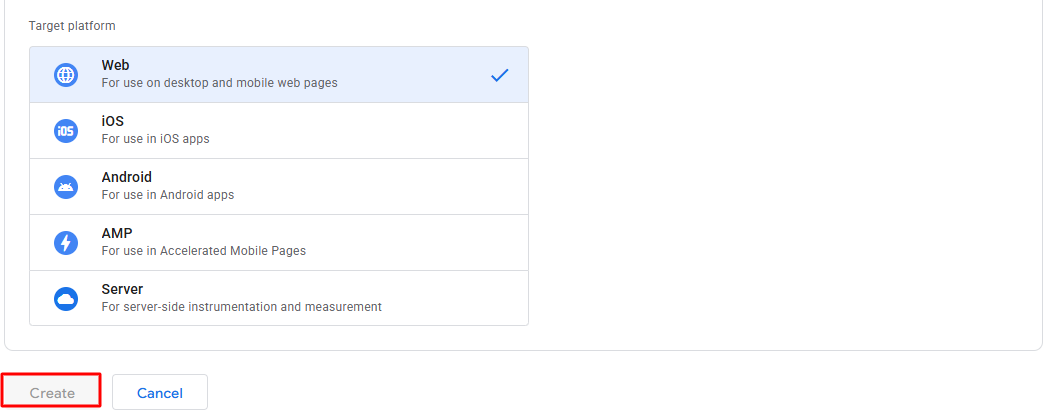
Once you add your business name and website, Google will ask where you want to run GTM. You need to select Web because we are working with Shopify. That’s all. After that, your GTM account will be created in seconds.
Once your GTM account is ready, Google will hand you a small piece of code. You will paste this code into your Shopify store. Without it, GTM won’t work on your Shopify store. In simple terms, this code is what lets you add Google tag to Shopify and make tracking possible.
Now, here’s where you should not panic. You will see two boxes with two different codes. If you don’t understand it, relax. You don’t have to understand a single line of it. Your only job is to copy it safely.
Google gives you two codes: one for the <head> section and another for the <body> section of your website. Both are important. Many people just add the first one and leave the second. And when they verify it, GTM does not work. But you should not make that mistake.
Pro Tip: Keep this code open in a tab or save it in Notepad. You’ll need it in the next step when we go inside Shopify.
Now comes the very important part of the process. Now you will have to put the GTM code inside your Shopify store. You just have to copy and paste the code by following the steps below.
Here’s how you can perform it:
Log in to your Shopify Admin panel.
Go to Online Store > Themes > Edit Code.
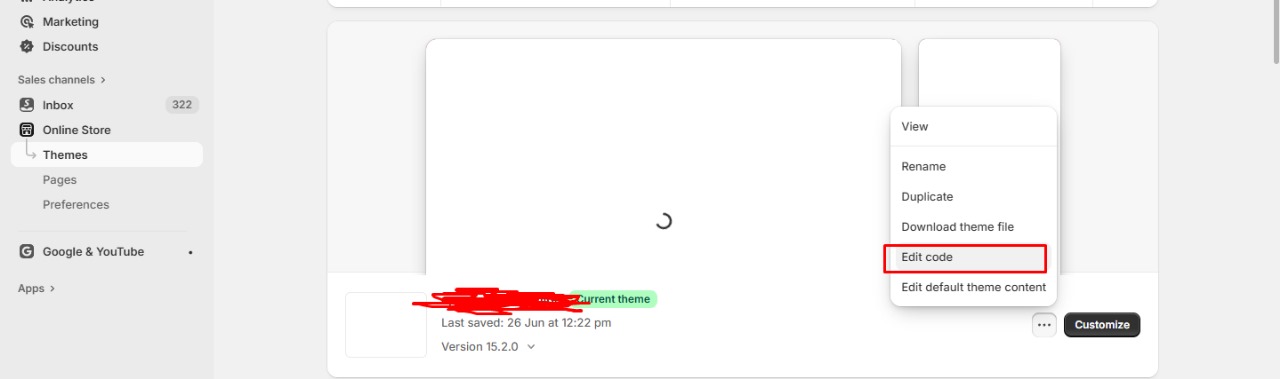
Open the theme. liquid file. Don’t touch anything else—only this file.
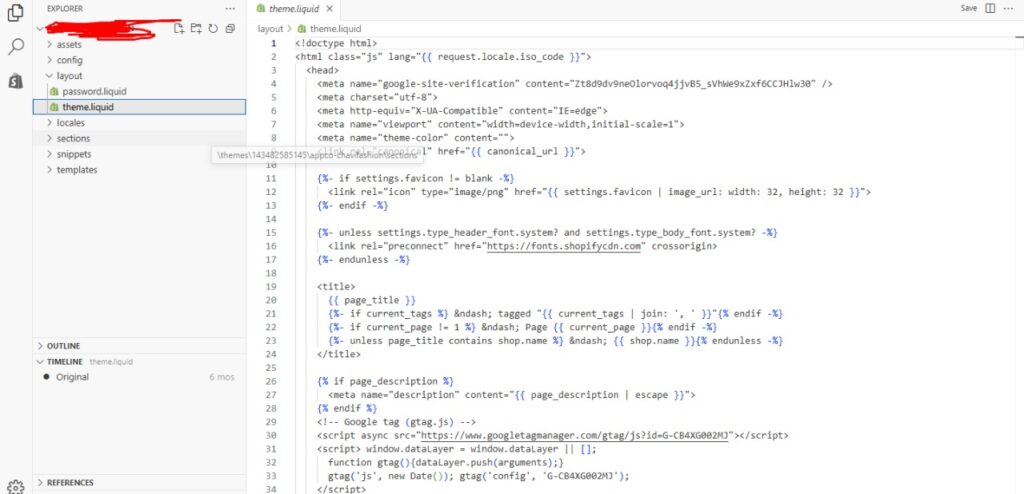
Paste the first GTM code inside the <head> tag (near the top).
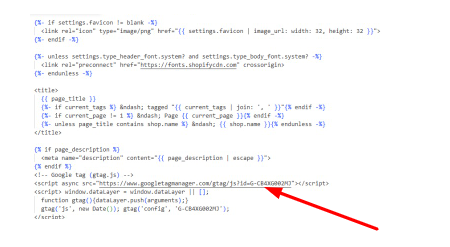
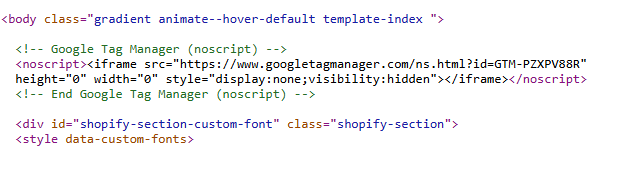
Paste the second GTM code right after the opening <body> tag.
That’s it. And then hit the Save button.
Important: Do not delete or edit anything else in theme.liquid. One wrong click and your store may look broken. If you’re scared, take a backup before pasting.
Once done, your Shopify store and GTM are officially linked. From here, GTM can track what people do on your site. For example, what they click, where they scroll, and if they buy any of your products or services.
Now we assume that you have pasted the code. But how do you know it’s working? To check that, here are the steps:
Go to your Shopify store in a browser.
Right-click → click on View Page Source.
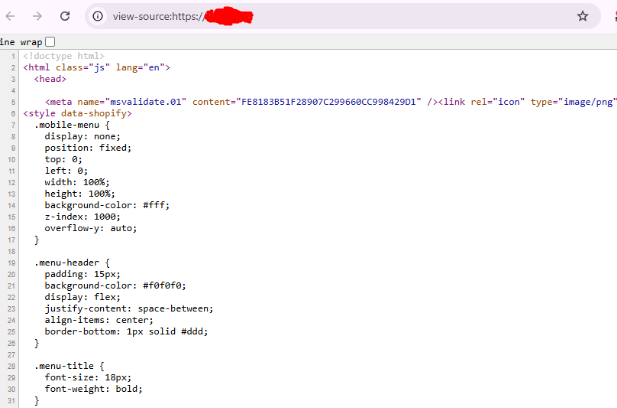
Now, search (Ctrl+F or Command+F) for GTM-.
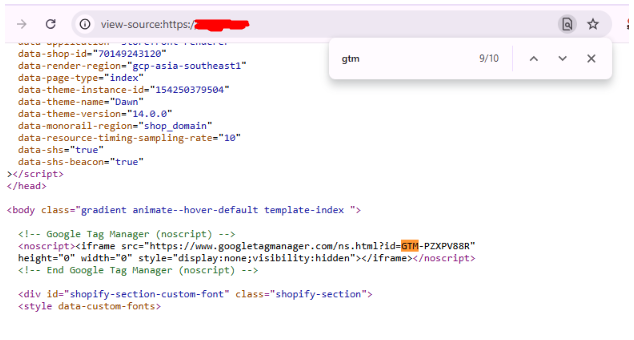
If you see your GTM ID, congrats, it’s live. Another simple way is to use the Google Tag Assistant Chrome extension. Turn it on, visit your store, and it will tell you if GTM is active.
Once you confirm GTM is active, you’re ready to start adding tags—like Google Analytics, Facebook Pixel, or any tracking code you want.
Go back and confirm you didn’t miss anything. If you used an app (like GroPulse GTM + Data Layer), make sure it’s switched on. If you pasted the code directly, open theme.liquid and check both snippets are where they should be. Save it again, just to be sure. Small mistakes here break everything.
This one catches a lot of people. GTM doesn’t always load if your browser has an ad blocker running. Turn it off, refresh your site, and see if GTM shows up. Sometimes the problem isn’t your code—it’s your browser.
If your tags are still not active, it might be a data layer mess.
Fix these three things, and in most cases, your Shopify tag manager setup will start working correctly. You should not overcomplicate it; 90% of the time, it’s either a copy-paste mistake, an ad blocker, or a double setup.
Setting up Google Tag Manager in Shopify is not rocket science, but it’s also not as simple as just pasting some code and forgetting about it. One wrong step and you will either break your tracking or worse, end up with wrong data that leads to wrong decisions. And for an online business, wrong data can cost sales, money, and even trust.
So before you go ahead, here are some mistakes you must avoid.
The GTM container has two parts—one for the <head> and one for the <body>. Many store owners either paste both in the same place or miss one. If you don’t put the code exactly where Google tells you, your tags won’t be active. This is one of the most common mistakes beginners make, so double-check before you click on the save button.
Some people add tags and publish without testing. Later, they realized nothing was working. GTM has a built-in preview mode for a reason. You must use it. Always test your setup before you push it live. This small step saves you from a lot of trouble later.
It happens often when you’re in a hurry. You add Google Analytics directly to Shopify settings, then again in GTM. Now your data is double-counted. Bounce rate, conversions, page views—everything looks wrong. This makes it almost impossible to trust your numbers. You should pick one method: either connect directly or do everything through GTM.
Many people only test on the desktop. But most online shoppers in India and across the world buy from mobile. If you don’t check how your tags work on mobile, you might miss half of your data. Always test across devices.
Inside GTM, tags, triggers, and variables can quickly become a mess. If you don’t name them clearly, later you won’t remember what does what. Use proper names, like “GA4 – Purchase Event” instead of just “Tag 1.” A little organisation today will save hours tomorrow.
Too many tags can slow down your site. A slow Shopify store kills conversions. Add only what you need and remove extra tags. GTM is a helper, not a dumping ground for every script you find online.
Also Read: How to Create a Shopify Store: Step-by-Step Guide for Beginners
At Appco Software, we know how important tracking is for every Shopify website store. Without the right data, you are only guessing what works and what doesn’t. That is why our team helps business owners set up Shopify tag managers the right way, without errors and without wasting time.
We don’t just paste the GTM code and leave. Our Shopify experts make sure every tag, trigger, and event is placed correctly. From Google Analytics to Facebook Pixel, from conversions to remarketing—we set up everything so your store collects clean data. And above all, we test everything before going live.
Apart from GTM setup, Appco Software also provides Shopify store design services and Shopify website design services. Whether you are just starting or running a big eCommerce brand, we help you with:
With more than 13 years of experience and 5000+ projects delivered, our team knows how to build Shopify stores that perform. If you need a trusted partner to grow your online business, Appco Software is here to help.
If you’re a tech person and follow the steps, you can do it in just one hour. If you skip testing, double that because you’ll end up fixing mistakes later.
Nope. You just need to know where to paste the GTM code to add the Google tag to Shopify. Shopify makes it simple enough, unless you go poking around in Liquid for fun.
Yes, you don’t have to paste Facebook Pixel separately. Drop it into GTM, keep everything in one place, and relax.
No, not at all. GTM will never make your store slow.
You need to choose one method. If you’ve added GA directly and then again through GTM, you’ll mess up your numbers. Remove one and keep it clean.
Yes, 100%. Because with GTM, you don’t have to touch theme code every time you add or remove a tag.
Absolutely. Even if you’re just starting out, clean data helps you grow faster. GTM is not just for big stores, but every store.
Yes, and we’ve done it hundreds of times. We set up GTM, test every tag, and keep it tidy so you can focus on selling, not stressing.

Appco Software has been around for a very long time, helping startups and established brands build iconic websites and apps. For your unique idea to be presented in a beautiful way, contact us now!